
Color Blocking Mod Furniture Makeover: Krylon Spray Paint Edition
Disclosure: This blog contains affiliate links. I will receive a commission for items purchased through these links at no extra cost to you. I appreciate your support. Please read all labels and follow all manufacturer safety recommendations when working with paints, stains, and other equipment.
Extreme Mod Makeover...but make it Krylon Spray Paint only.
The Builders Challenge put out a Color Your World challenge to the furniture painting world to refinish a furniture piece with color. And I was so ready to take it on. I had a modern color blocking inspiration piece that I had my eye on, and this was the perfect project to tackle it.
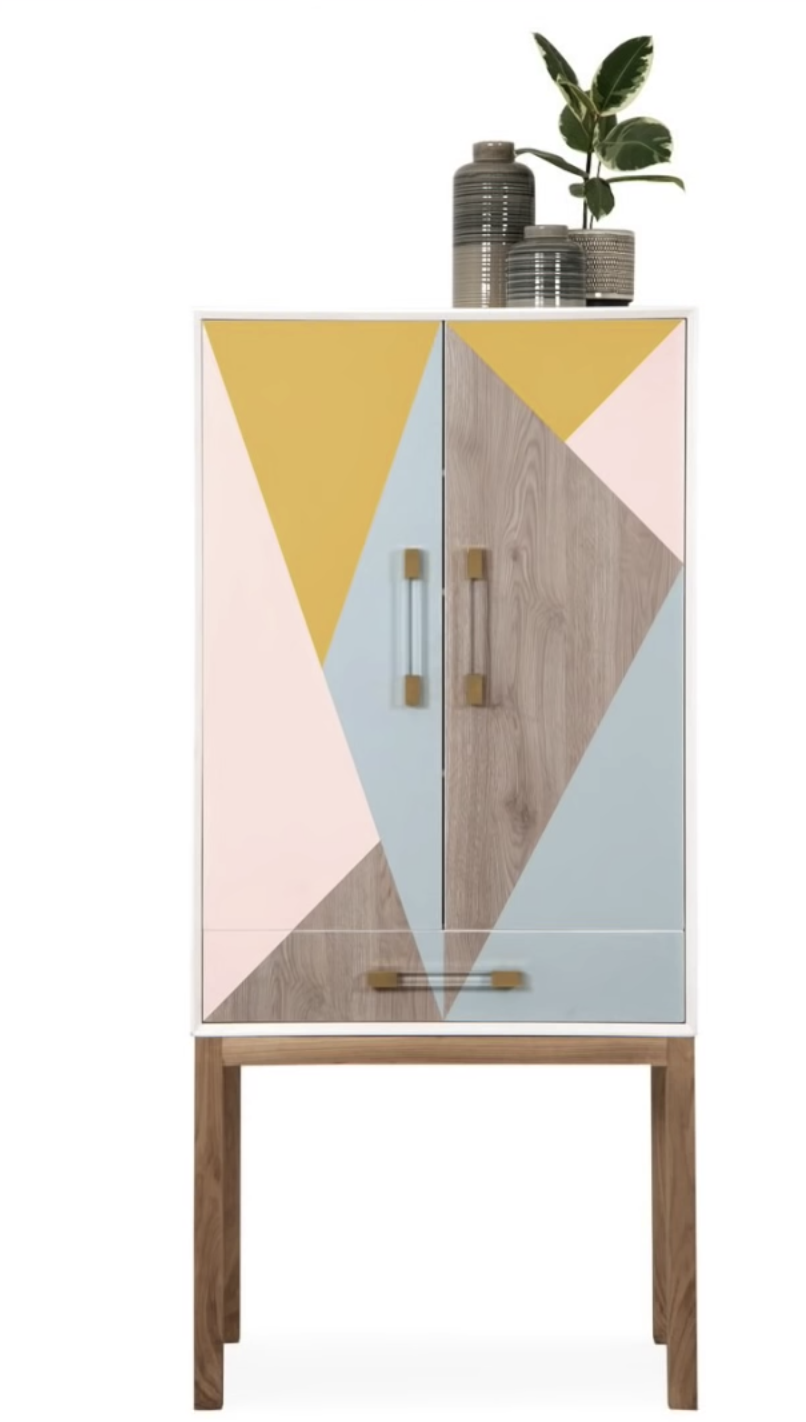
My inspiration piece (shown below), is a $3,200 piece! I’m going to be showing you how you can get the same stunning results for MUCH CHEAPER.
Here is one of the coolest parts about this project...this piece actually WON the challenge! You won’t believe this makeover...definitely check out the reveal.

Materials Used for Color Blocking Mod Makeover
Krylon Fusion All-In-One Satin White
Krylon Fusion All-In-One Satin Peacock Blue
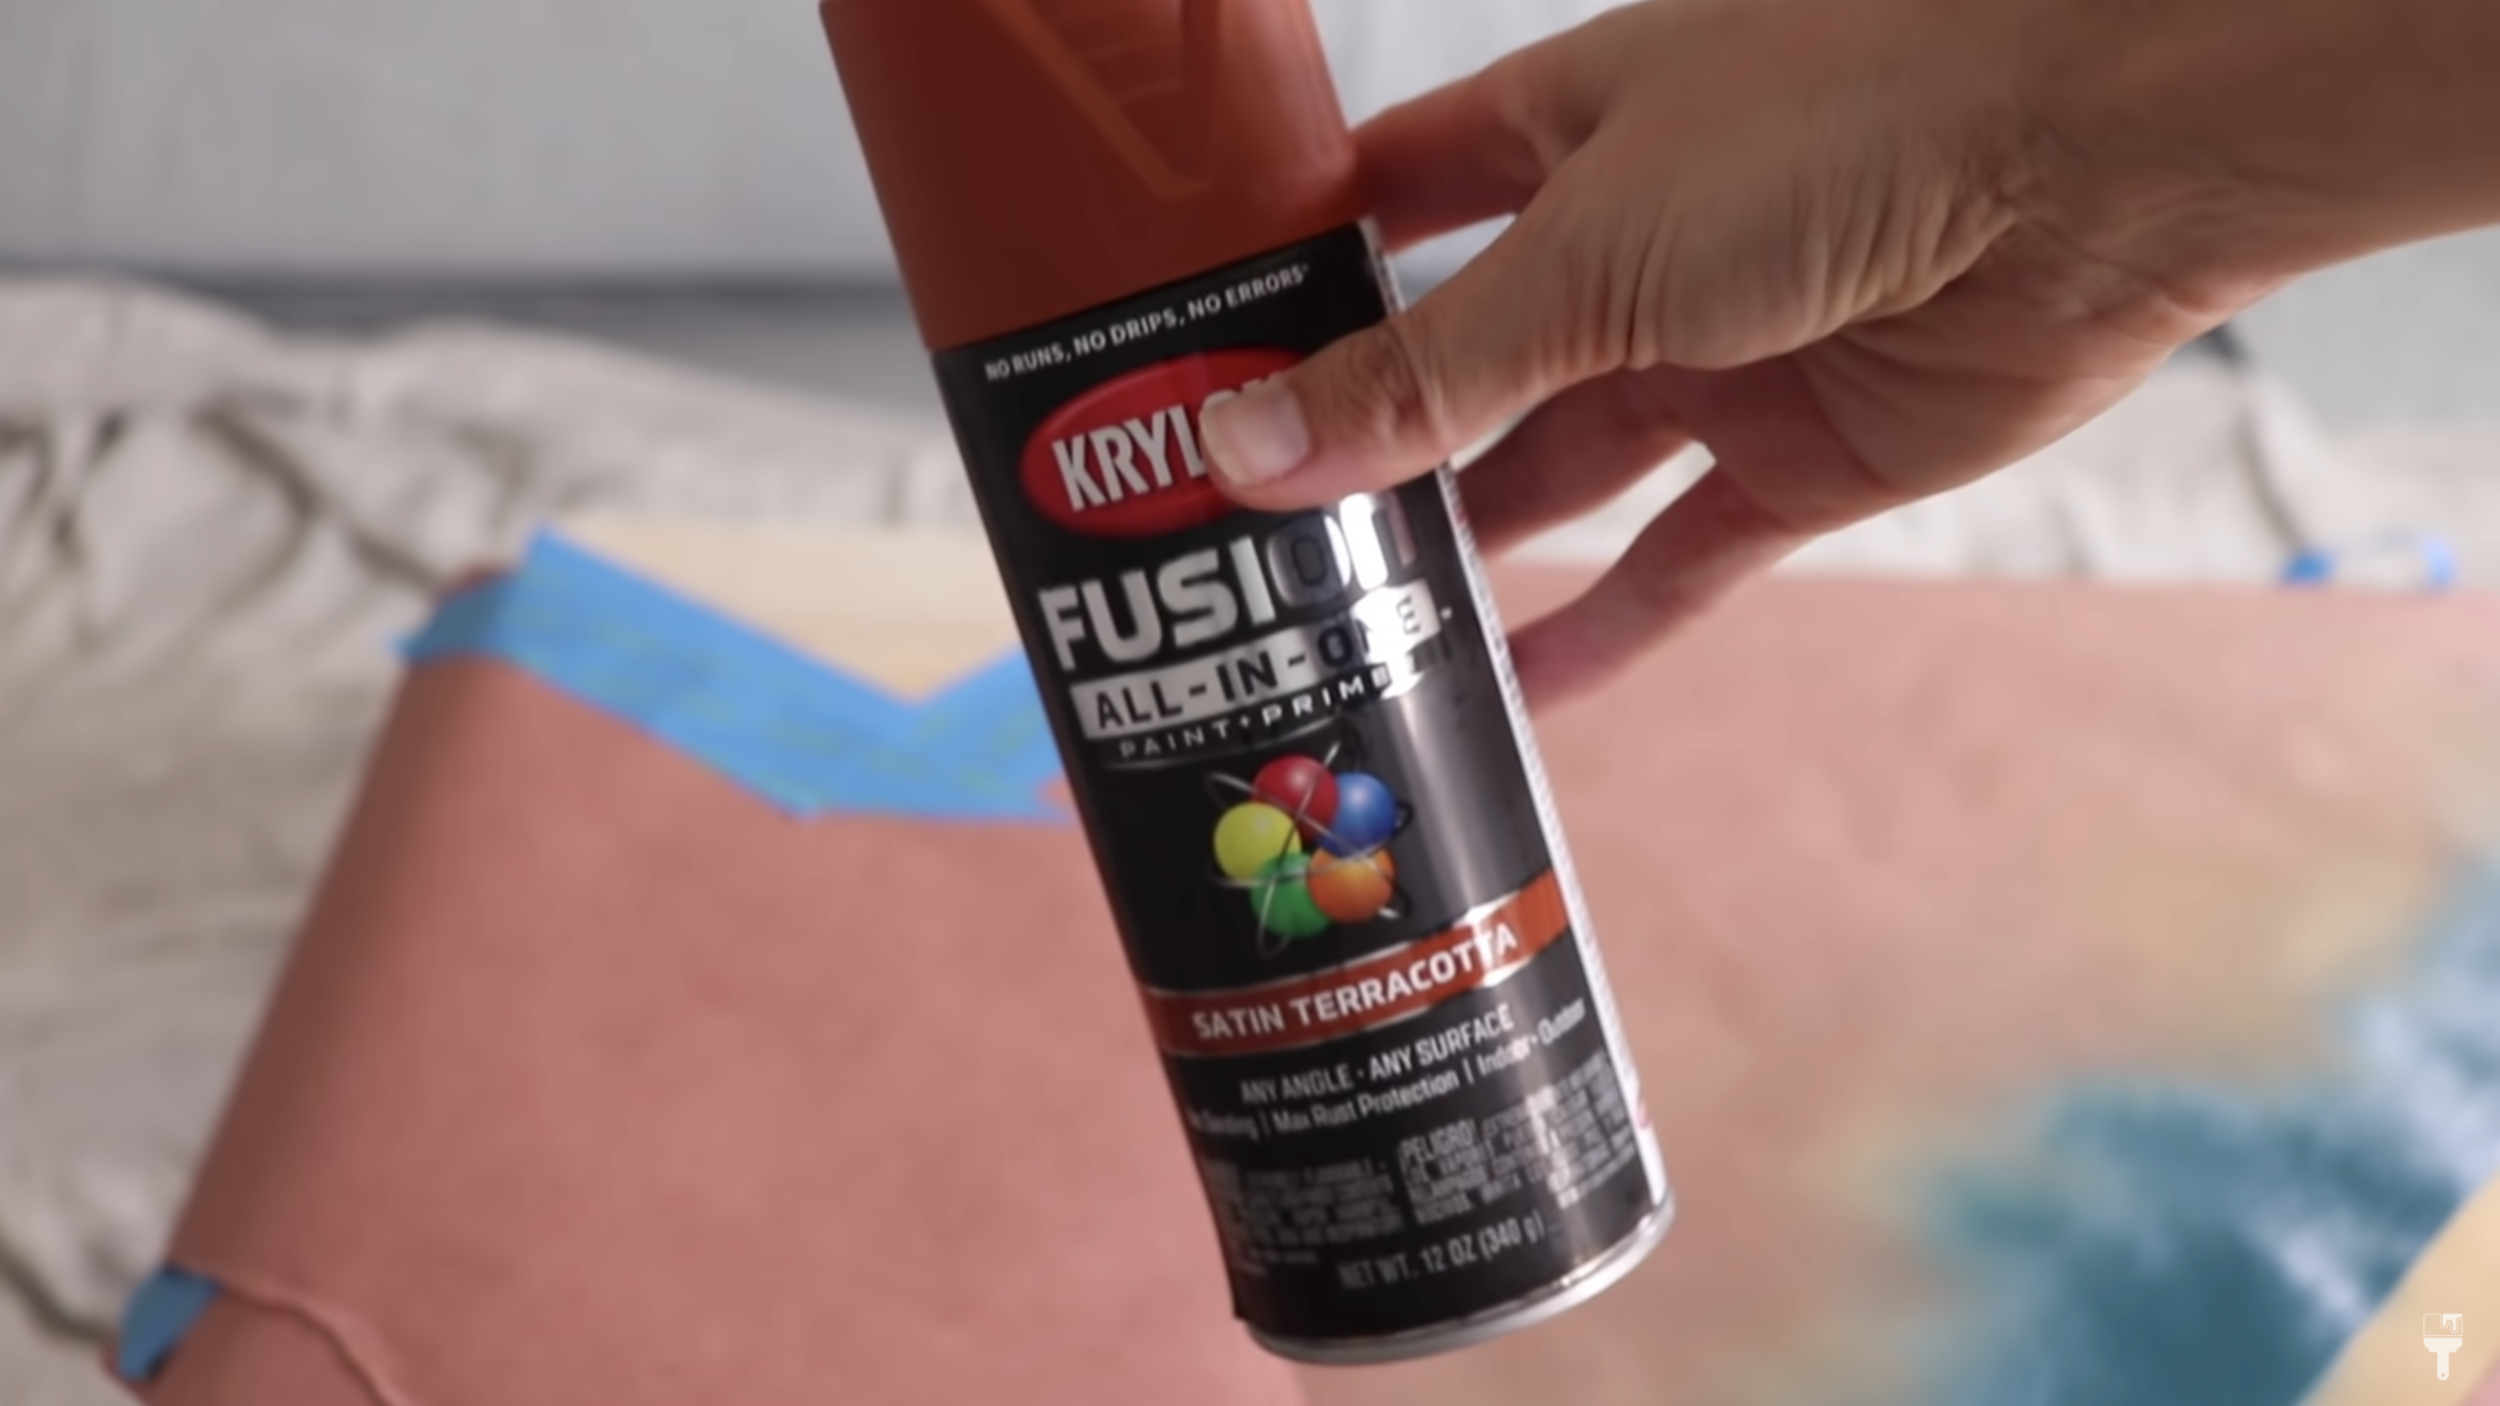
Krylon Fusion All-In-One Satin Terracotta
Krylon Fusion All-In-One Metallic Gold
Krylon COLORmaxx Satin Crystal Clear
Krylon COLORmaxx Matte Summer Wheat
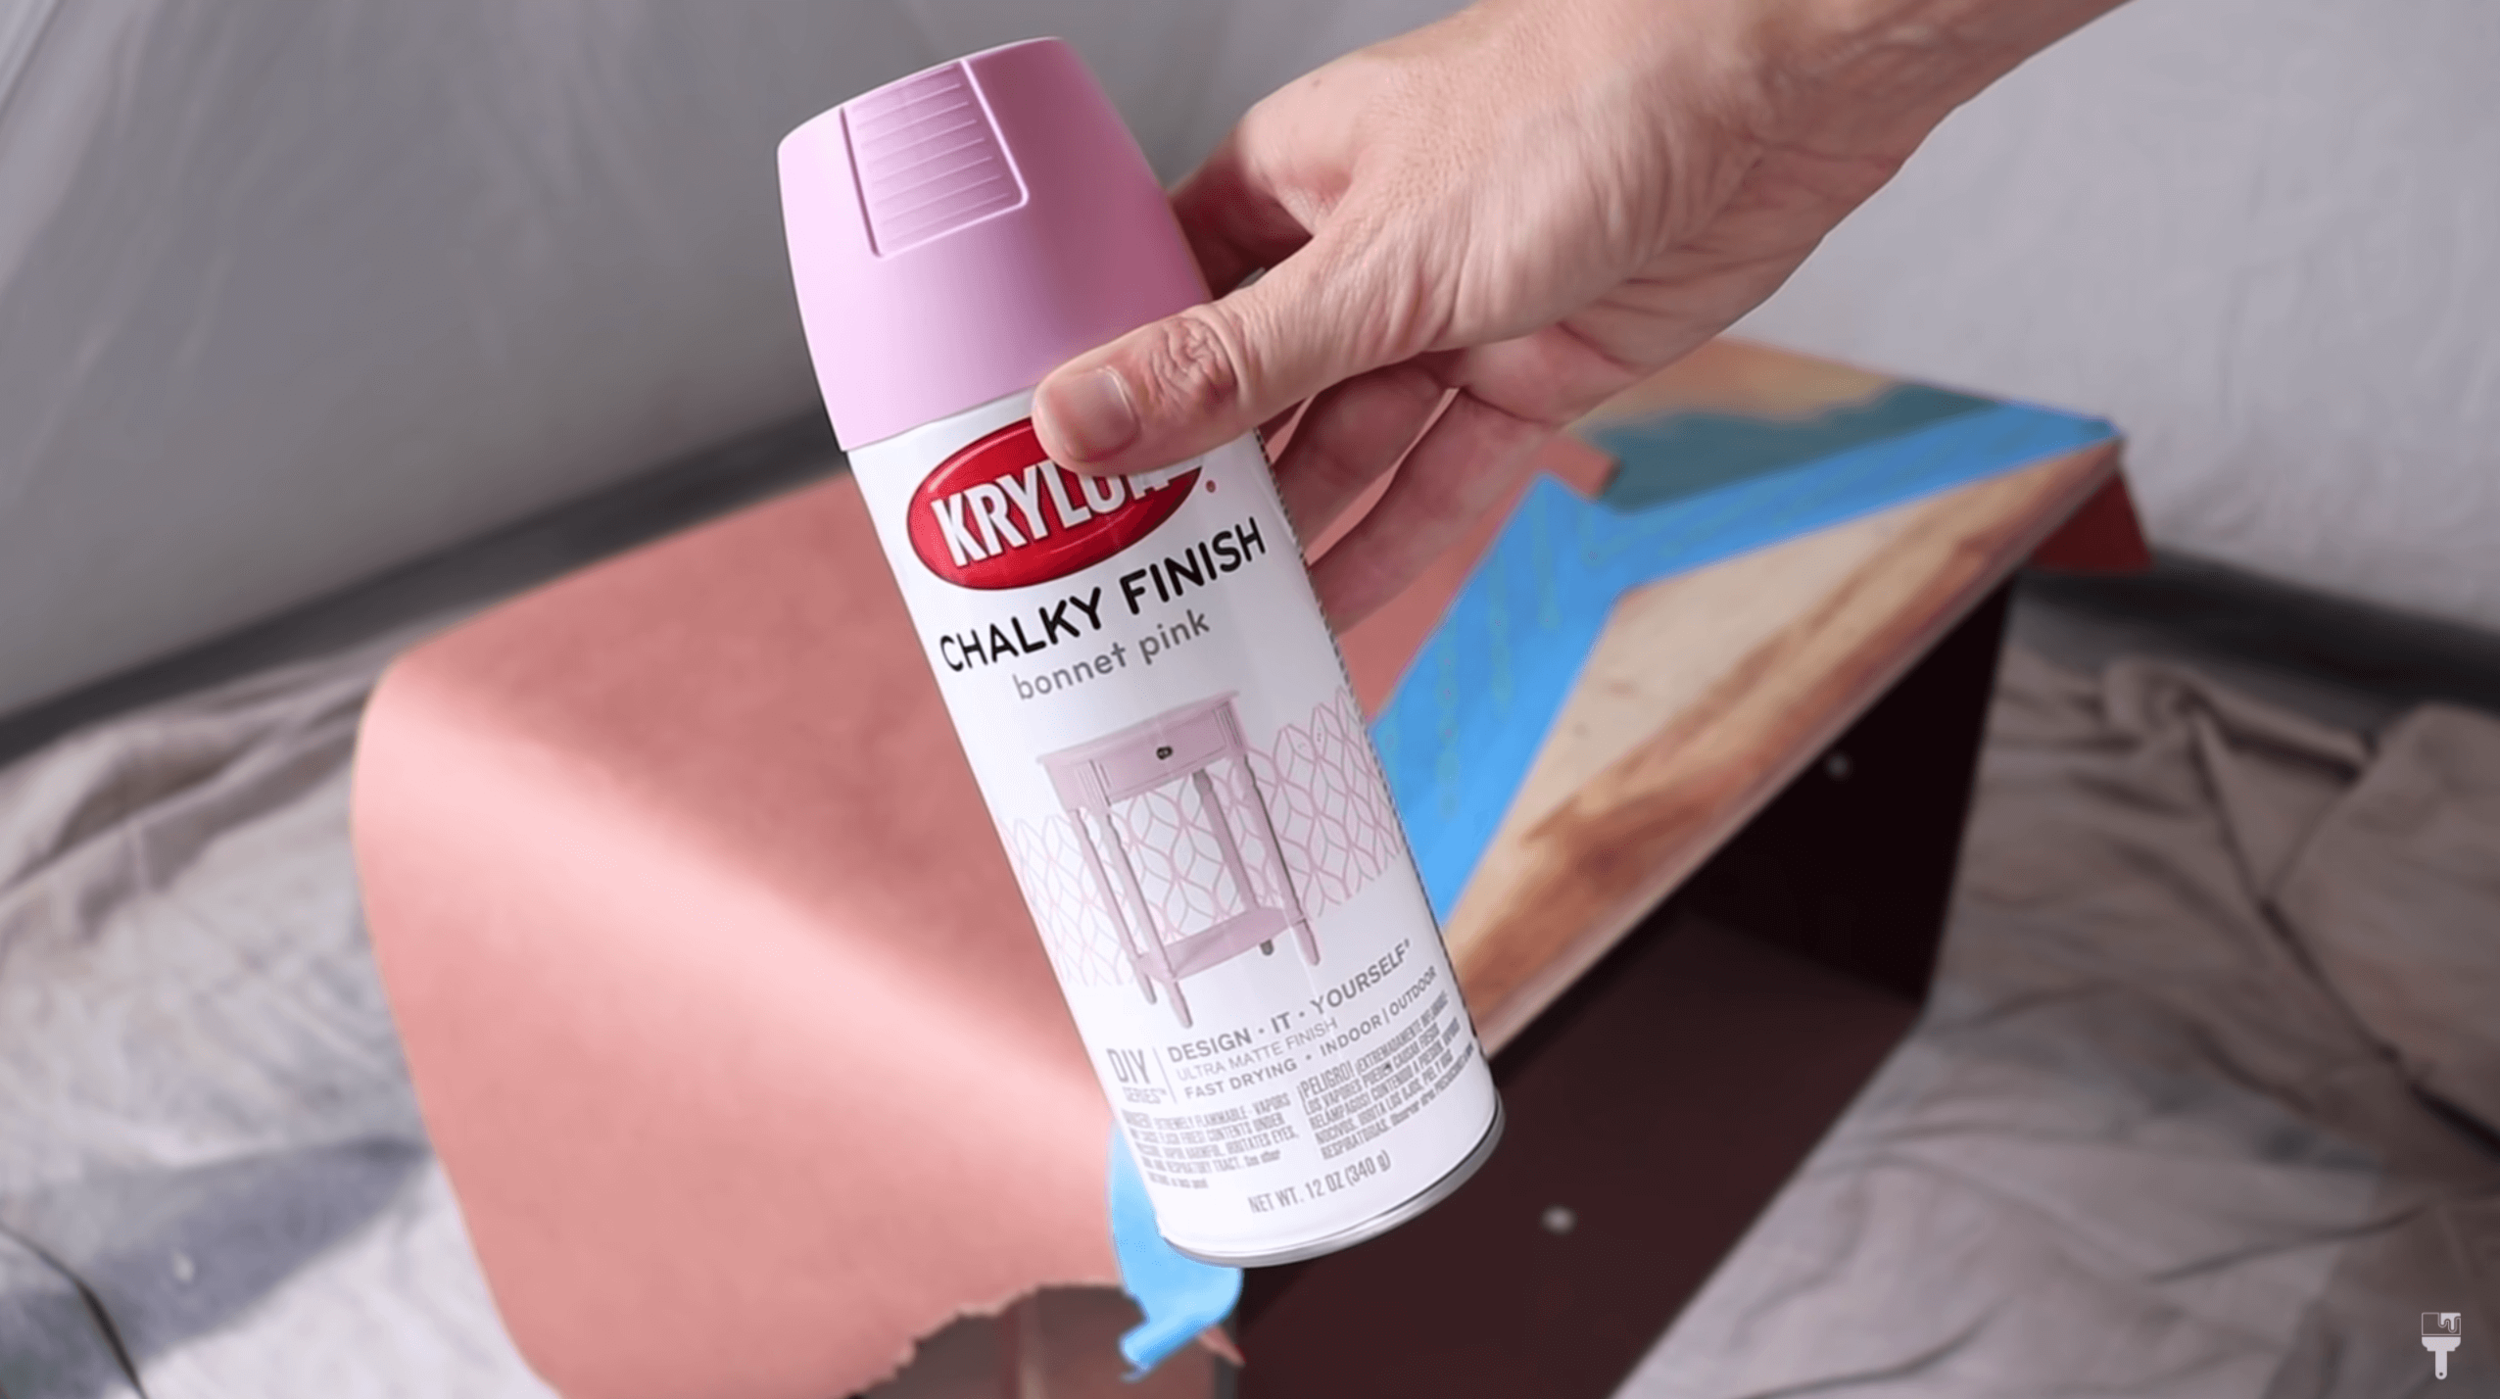
Krylon Chalky Finish Bonnet Pink
Krylon Spray Painting Tips
Here are some basic general rules that I’ve learned in my experience spray painting my pieces:
Shake up the can for two minutes before spraying
Do long, overlapping strokes and lift up on the button after every pass
Work in a very well-ventilated space and wear a mask to protect yourself
Get your spray tent set up and drop cloths on the floor to protect your surroundings
Spray thin layers with multiple coats and wait 1 minute between each coat
Extreme Mod Makeover Dupe: Krylon Spray Paint Edition Step by Step
Step 1: Prep Piece for Color Blocking Krylon Spray Paint

Clean
I started off by cleaning my piece with a degreaser. You can use any kind of soap or cleaner that you have. You just really want to make sure that your piece is clean before you try to adhere any paint to it. And no matter what cleaner you use, you always want to wipe it back and rinse it with some clean water afterward.
The rags never lie. Your paint's not going to stick to this, so make sure you get it all.
Remove Hardware
I removed all the hardware before I sanded my drawers, and to save money, I'm going to end up spraying the existing hardware a metallic gold down the road, so I put them aside for later.
Sand
My piece had a lot of nicks and dings and I was going for a smooth, modern finish, so took a wood filler that is paintable, and I filled in all the imperfections that I saw.
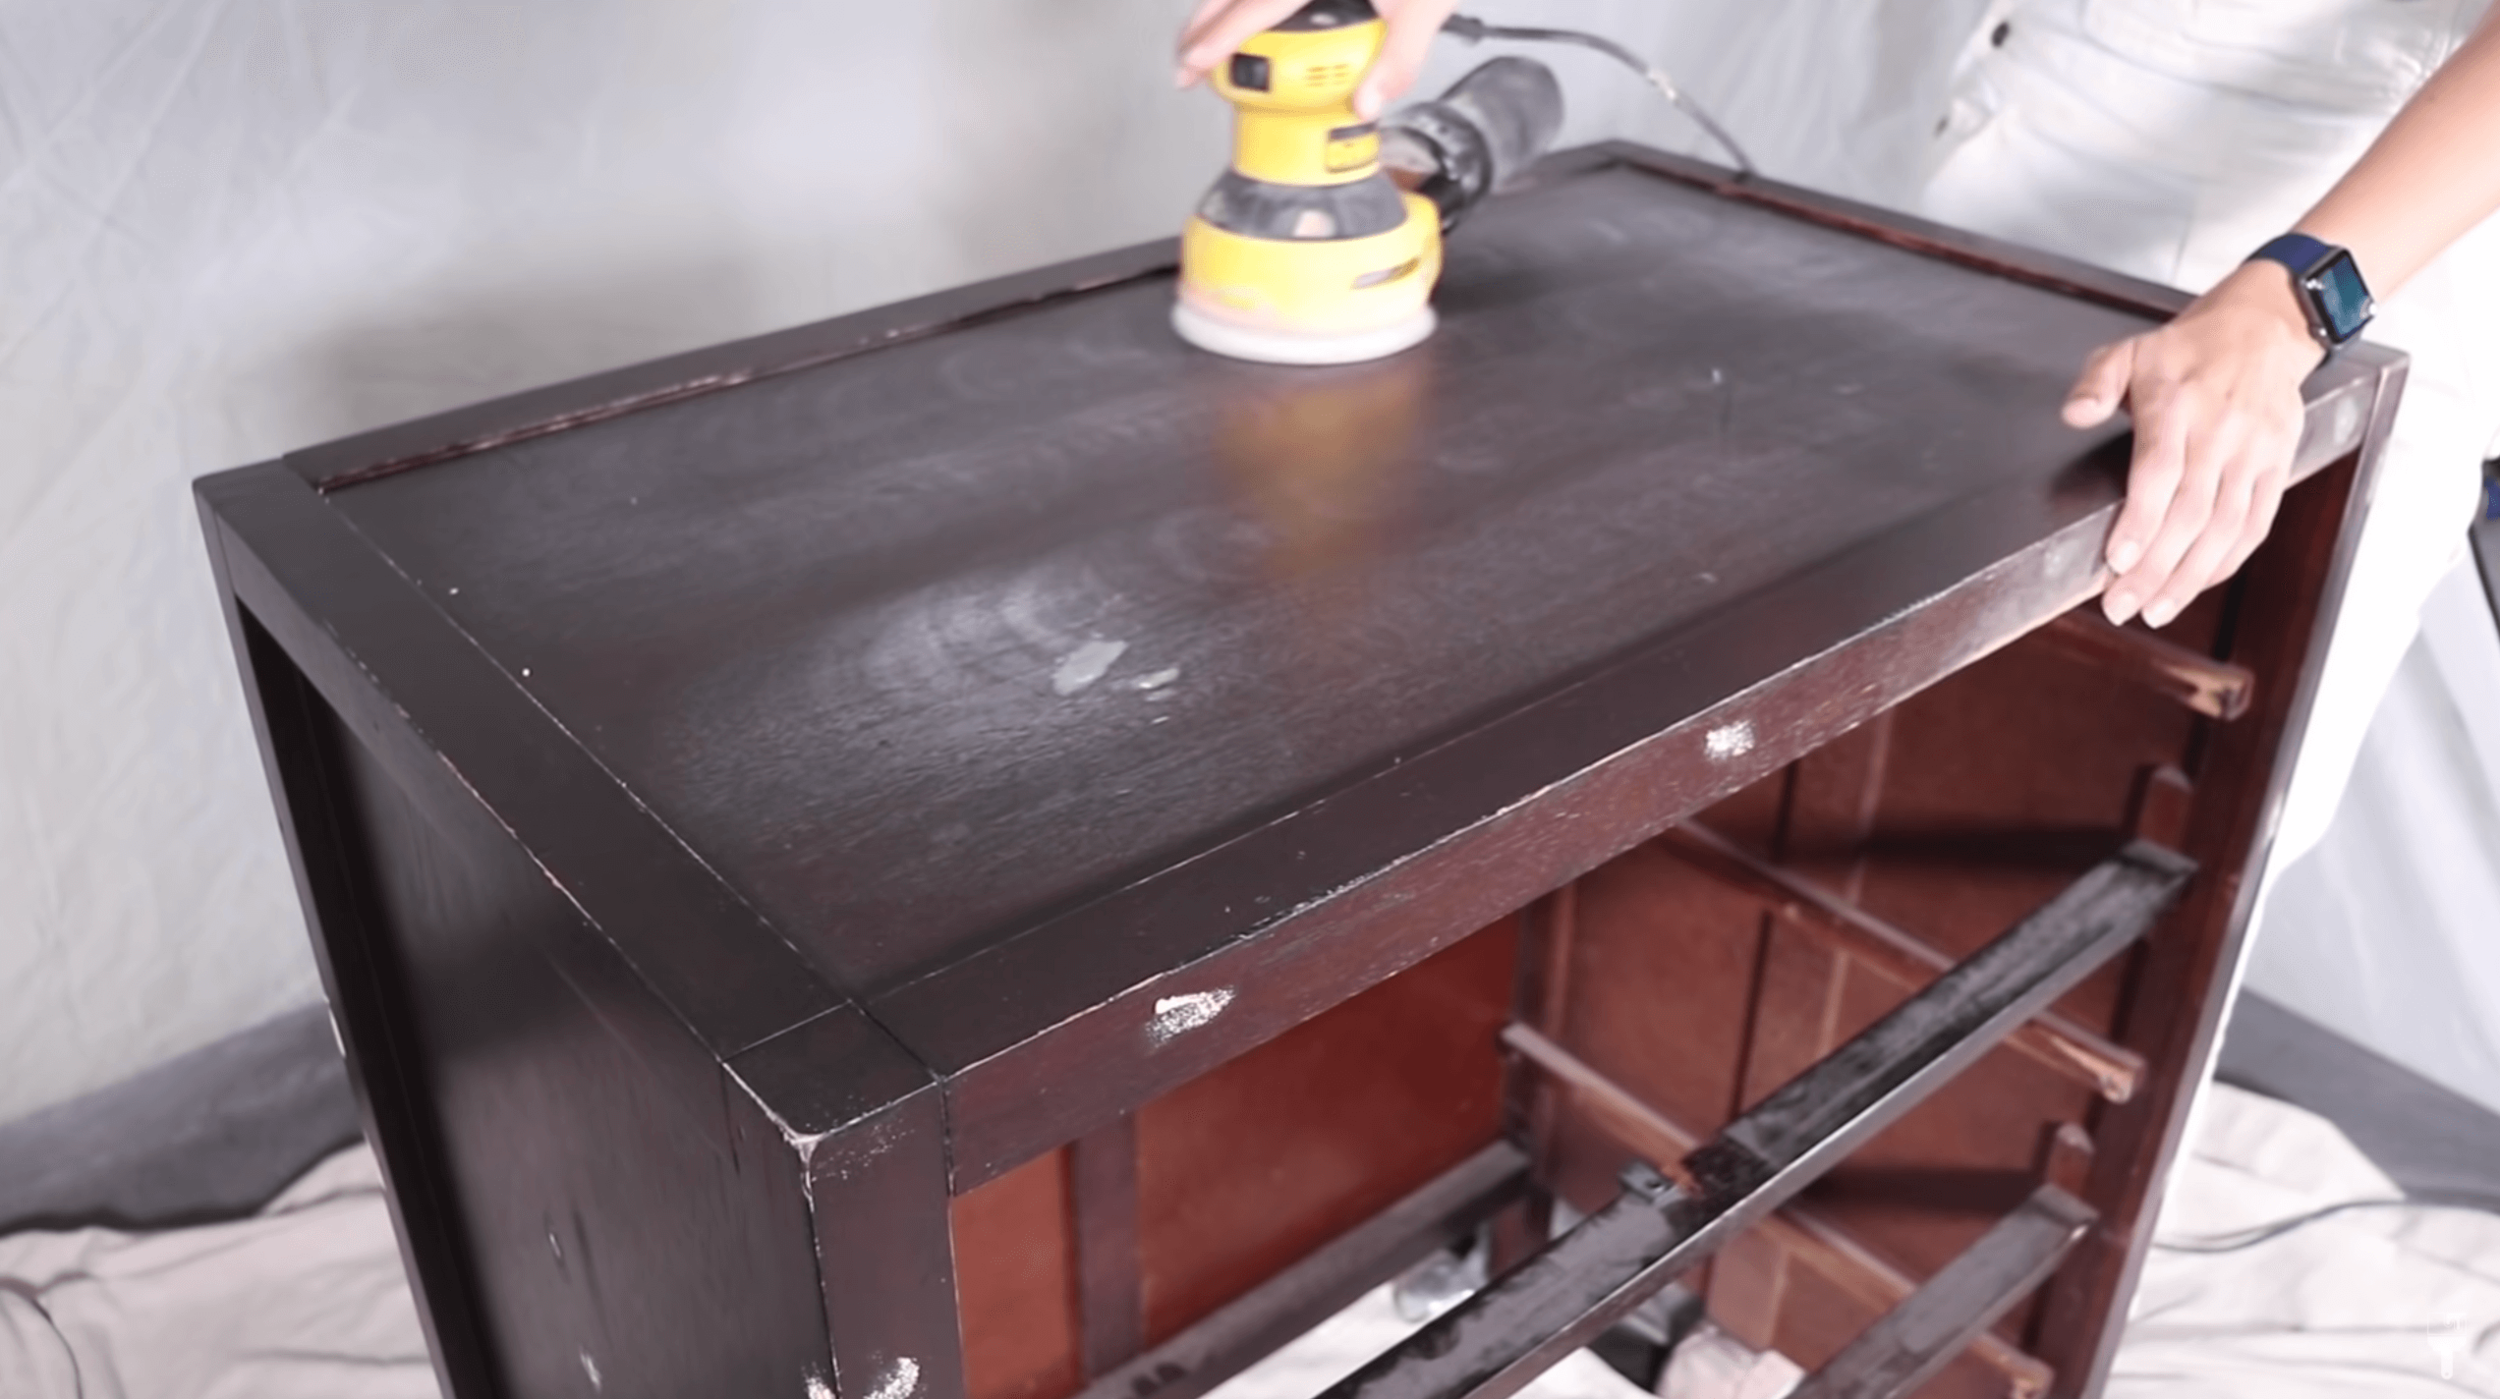
Once the wood filler dried, I used a 220 grit sandpaper to smooth everything back.
I grabbed my orbital sander to do some scuff sanding on the surface because it was really shiny and I wanted to make sure the paint would stick.
You're not going to have to do this with every single piece, but I definitely thought this one needed it. You could do this with any entry-level sander like this. You can usually find them from $30 to $60.
I also stripped back the drawers completely because I’m going to be using the raw wood as part of my color-blocking makeover. I used a 120 grit sandpaper for this as well as the fee of the dresser to reveal the bare wood underneath.
Now that I have all that stain removed, I took a 220 sandpaper and smoothed out this raw wood. After you sand, make sure to wipe back all of the dust again.
Seal Natural wood

Before I painted the body, I wanted to seal the feet, so I applied some Krylon Color Maxx Clear to keep the beautiful look of the raw wood but give it a slight satin finish. The Color Maxx comes with this really big button spray tip that makes it really easy to spray and you can spray it in any direction. I did two coats on the legs letting it dry about a minute in between each coat. You definitely want thin layers versus one thick coat.
I let this dry overnight and then came in and taped the feet off. So when I start spraying the base white, they will be protected.
Step 2: Spray Paint Base
To get a crisp line, I took some of that clear and sprayed it around the tape to set it. I let it dry for about 1 minute and then started on my white. I chose the Krylon Fusion All-In-One to paint this base because it has superior adhesion and durability. You don't need to prime with it and, like I said, you don't need to sand the piece back. I did scuff this up a little bit because it is a shiny factory finish just to give the paint a little help adhering. But you're not going to have to do that in every single case.

Since I was taking this from such a dark color to a light color, it took a lot of coats. I didn't keep track of all of them, but I used three cans to cover both of the sides, the top, and the front of the frame.
Once my last coat was done, I went ahead and removed the tape on the feet. I like to remove these when it's wet because I feel like you get a cleaner line.
Step 3: Pick Out Your Krylon Spray Paint Colors
Krylon Spray Paint Colors I Used
Krylon COLORmaxx Matte Summer Wheat - First color I'm using is matte summer wheat. It's a really beautiful mustardy, deep kind of yellow. And since it is so light, I had to do three coats and I waited one minute in between each coat.
Krylon Fusion All-In-One Satin Peacock Blue - The next color I'm using is satin peacock blue. I incorporated a couple more different fall colors based off the original piece that I'm trying to be inspired by. Just know that when you're putting your paint on, it will look brighter than it's going to dry to. The top of the can really shows you what color it's going to be. But when it's wet, it sometimes is brighter. But as it dries down, it really deepens up.
Krylon Fusion All-In-One Satin Terracotta - And I'm grabbing this beautiful terracotta color. Again, incorporating another fall type color into this color scheme. Now this one was super bright when it went on, it looks like pumpkin orange. But it dried down really dark and beautiful, which you will see in just a few minutes.
Krylon Chalky Finish Bonnet Pink - The next color I'm using is bonnet pink and this is one of their chalky finish spray paints. I had to try this out because you guys know how much I love chalk-style paints. I like the way that this sprays on it has really good coverage and it has a really beautiful map finish when it's done.


Step 4: Coloring Blocking Processes
Now it’s time to color block these drawers!
I started off by putting a clear base coat to seal the raw wood that is going to be part of my color-blocking. I put two coats on the drawers, and I let it dry overnight.
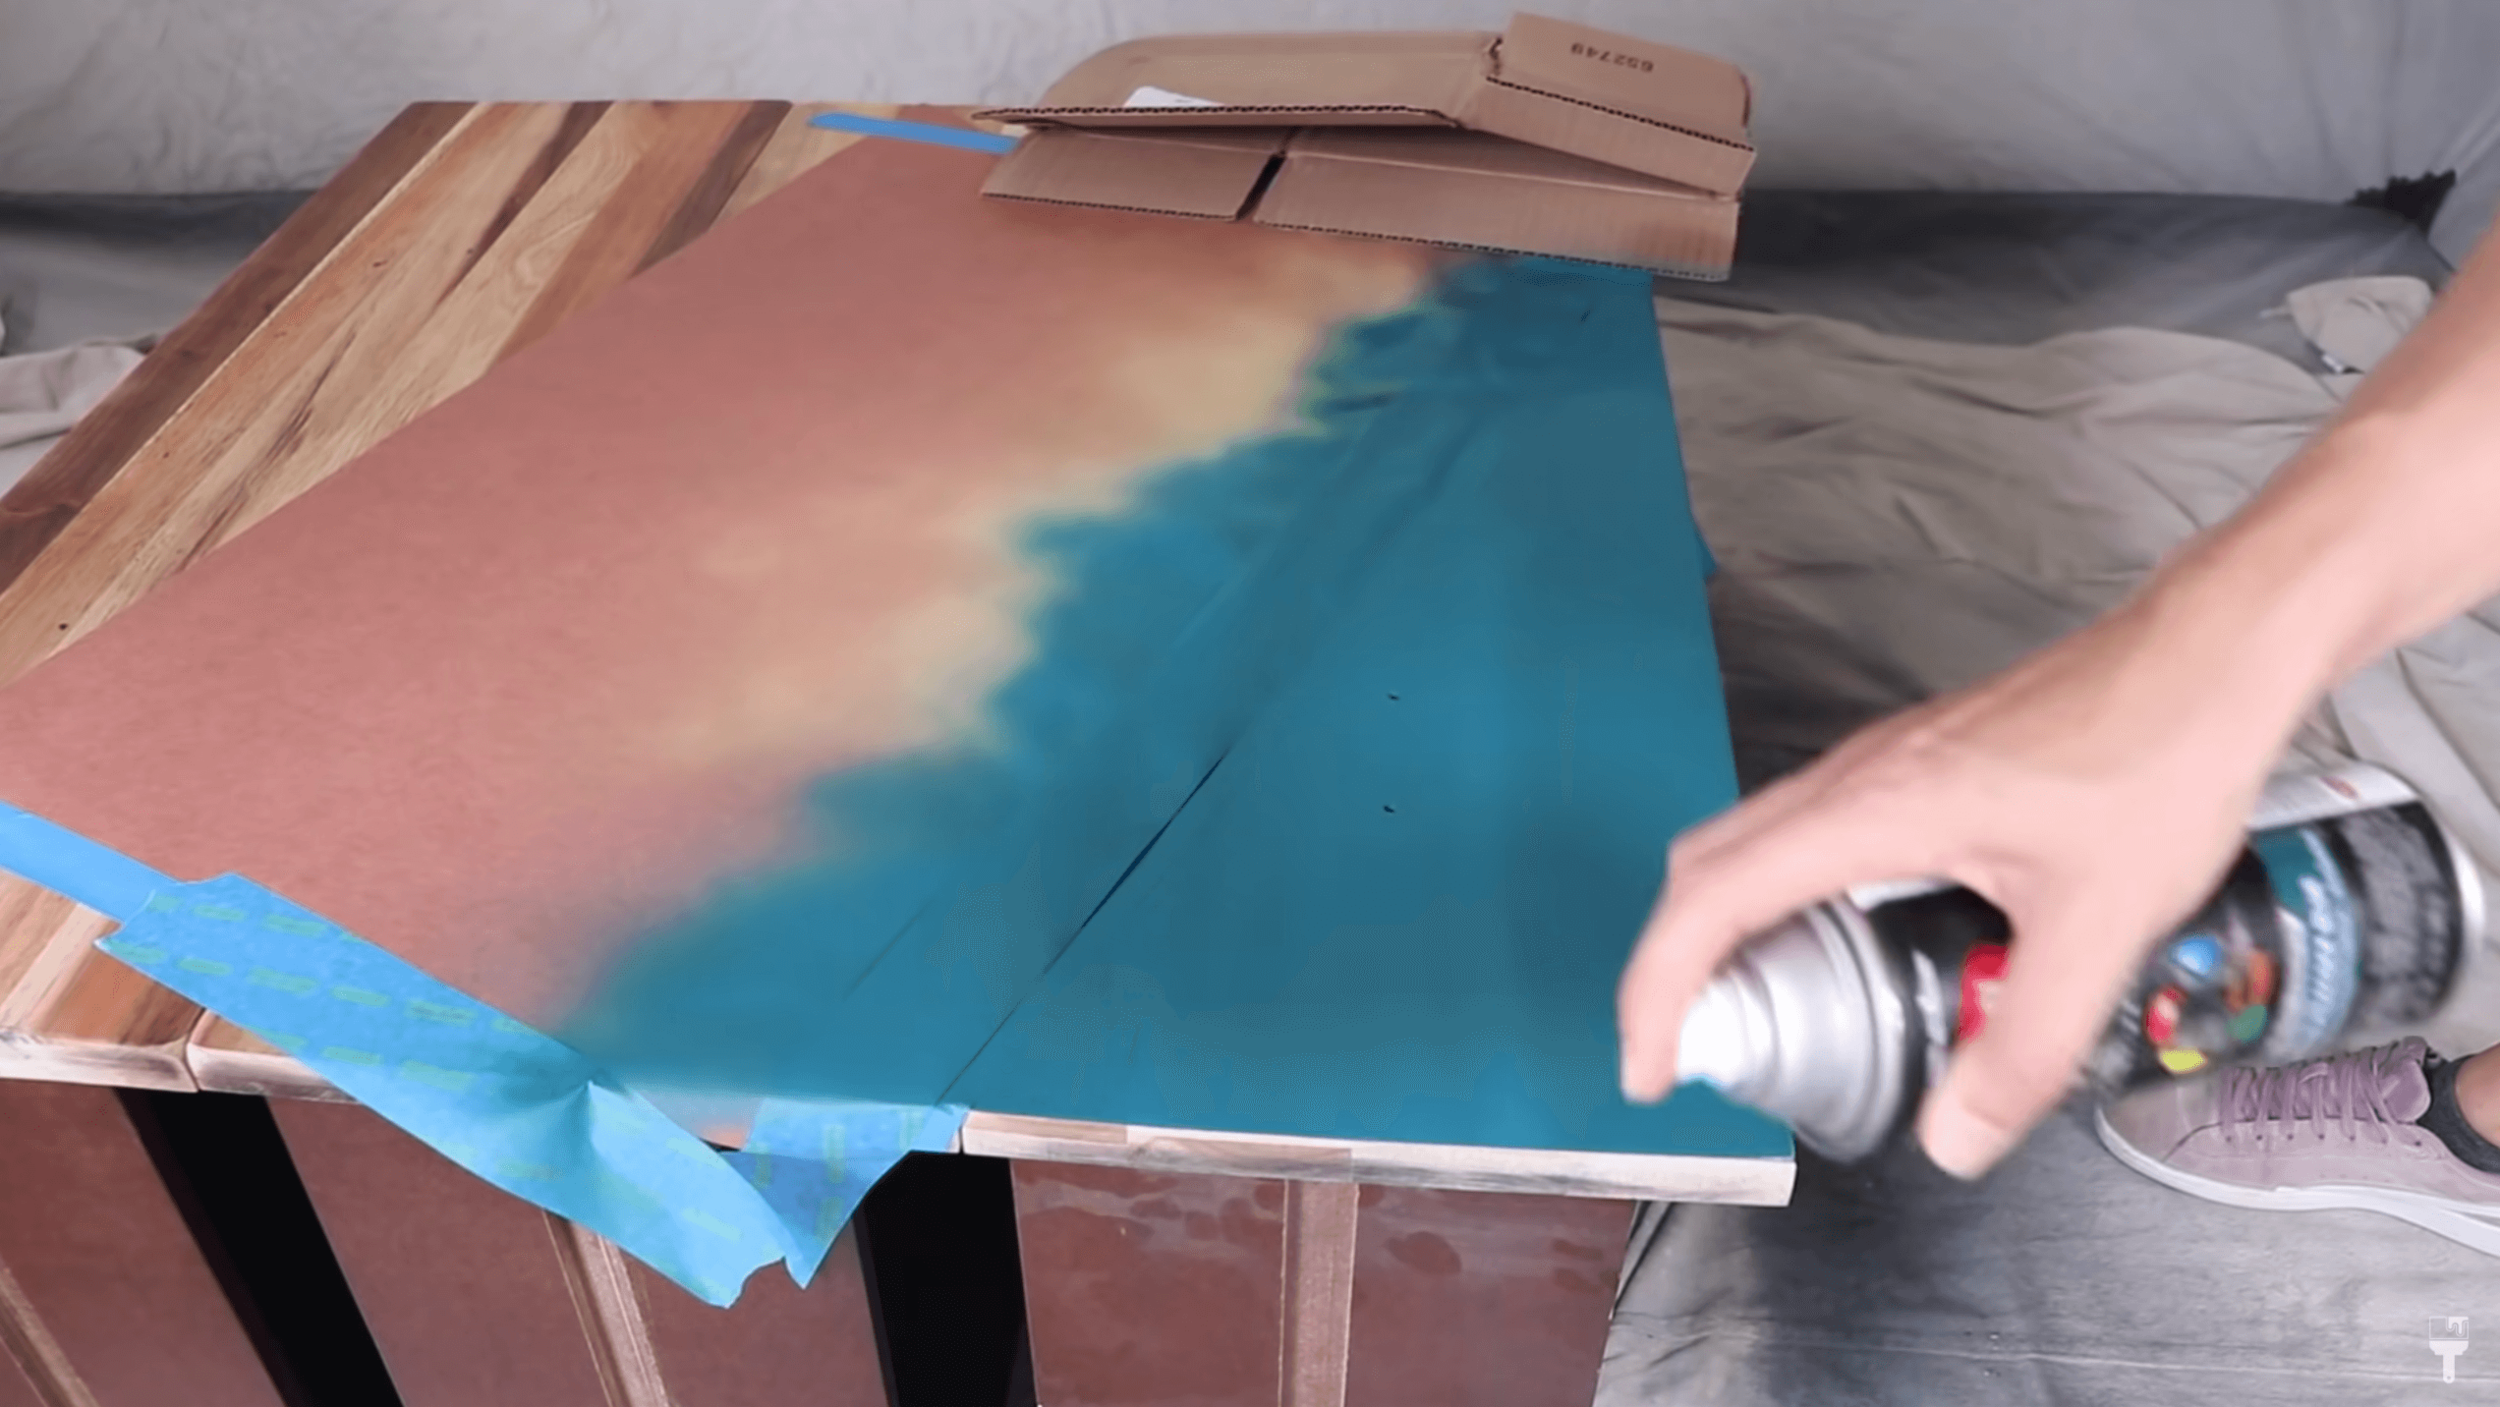
The actual process of color blocking these drawers was simple yet time-consuming. I split them into four triangles on each rectangular drawer. So, I started with a small triangle on the first drawer and worked off of that.
I used painter’s tape to shape my triangles and some butcher paper to cover the rest of the drawer. You can use craft paper, newspaper...anything you have to protect the rest of the drawer.
What took a long time with this process is that I did have to wait a full hour in between each color. This wasn’t ideal, but if you want it done correctly, you definitely want to wait for that paint to be dry before you put more tape on top of it.
Each color will need between 3-4 coats depending on the color. After the final coat of each color, I liked to pull back the painter’s tape while it was still wet to get those real crisp, clean lines
Bonus Color Blocking Tip: To get even crisper lines, you can seal your tape with the clear spray or you can use the color that it is actually touching.

I know that a lot of these steps may be hard to imagine, but that’s why you should also go check out the full video tutorial.

Step 5: Hardware & Finishing Touches
Paint & Reassemble Hardware
Because I had to wait so long between colors, I actually took a quick break in the idle to finish my hardware.
I grabbed the Krylon Fusion All-in-One Metallic Gold spray paint to give my hardware a beautiful metallic finish. My inspiration piece had clear acrylic and gold hardware, which looks really pretty. But they're really expensive, so I used what I have, painted it gold, and that gave me the same look at a much more affordable price.
After the drawers were completely dry, I reassembled the hardware.
No Seal Necessary
Just a side note here...typically I would be sealing my piece as a finishing touch, but the awesome thing about this Krylon spray paint is that it’s self-sealing, so no need to seal your piece!
Extreme Mode Makeover Dupe Reveals
Before the big reveal, I wanted to show you my all-in cost on materials for this piece. It ended up being $88! It would be a little bit more if you had to buy that sander, but still, it’s a great cost-saving compared to my inspiration piece. Who's ready for the reveal?
You guys are not going to believe this one. Here is my color-blocked piece completely done in spray paint. This has to be one of my favorite pieces ever.
I hope you are inspired by it and take on a fun color-blocking project yourself. :)


